ligerDrag()
使目标对象可以拖动。
参数
handler
拖动的作用区域,在这个区域才可以触发拖动。可以是字符串(jQuery selector),也可以是一个Dom jQuery对象
onStartDrag
开始拖动事件
onDrag
拖动事件
onStopDrag
结束拖动事件

示例一:默认模式
<script src="lib/jquery/jquery-1.3.2.min.js" type="text/javascript"></script>
    <script src="lib/ligerUI/js/plugins/ligerDrag.js" type="text/javascript"></script>
    <script type="text/javascript">
        $(function ()
        {
            $('#rr1,#rr3,#rr2').ligerDrag();
        });

    </script>
    <div id="rr1" style="200px;height:200px;top:230px; left:200px; background:#A6DBD8; z-index:1; position:absolute;"> </div>
   <div id="rr2" style="140px;height:300px;top:40px; left:350px; background:#AFCCF1; z-index:2;position:absolute;"> </div>
   <div id="rr3" style="200px;height:200px;top:150px; background:#DA9188; z-index:3;position:absolute;"> </div>
示例二:只能在Panel头部进行拖动
    <div id="rr1" style="200px;height:200px;top:130px; left:200px; background:#A6DBD8; z-index:1; position:absolute;">
        <div class="header" style="height:30px; line-height:30px; background:#A1D1D1">标题</div>
    </div>
        $(function ()
        {
            $('#rr1').ligerDrag({ handler: '.header' });
        });
示例三:设置onStartDrag事件,使当前对象位于最顶层
        function changeZIndex(obj)
        {
            $(obj).css("z-index", 2).siblings("div").css("z-index", 1);
        }
        $(function ()
        {
            $('#rr1,#rr3,#rr2').ligerDrag({
                onStartDrag: function (current)
                {
                    changeZIndex(current.target[0]);
                }
            });
        });
示例四:使拖动时对象半透明
 $('#rr1,#rr3,#rr2').ligerDrag({
                onStartDrag: function (current)
                {
                    current.target.addClass("l-dragging");
                },
                onStopDrag: function (current)
                {
                    current.target.removeClass("l-dragging");
                }
            });
示例五:显示拖动时的信息
 $('#rr1,#rr3,#rr2').ligerDrag({
                onDrag: function (current)
                {
                    $("#message").html(
                    "对象:" + current.target.attr("id") +
                    "<BR>X移动:" + current.diffX +
                     "<BR>Y移动:" + current.diffY);
                },
                onStopDrag: function (current)
                {
                    $("#message").html("");
                }
            });
ligerResizable()
使目标对象可以调整大小。
参数
handles
调整大小的作用区域,在这个区域才可以触发调整大小。字符串。包括n , e, s, w, ne, se, sw, nw这八个方向,可自由选择一个或多个,多个时用逗号隔开
onStartResize
开始调整大小事件
onResize
调整大小事件
onStopResize
结束调整大小事件

示例一:默认,不使用任何参数,这时handles='n , e, s, w, ne, se, sw, nw'
   <link href="lib/ligerUI/ligerui-resizable.css" rel="stylesheet" type="text/css" />
    <script src="lib/jquery/jquery-1.3.2.min.js" type="text/javascript"></script>
    <script src="lib/ligerUI/js/plugins/ligerResizable.js" type="text/javascript"></script>
    <script type="text/javascript">
        $(function (){
            $('#rr1,#rr2,#rr3').ligerResizable();
        });
    </script>
示例二:只能在右下角才能调整大小
$('#rr1').ligerResizable({ handles: 'se' });
示例二:设置onStartResize、onResize、onStopResize事件
$('#rr1').ligerResizable({
                onStartResize: function (current, e)
                {
                    $("#message").html("start");
                },
                onResize: function (current, e)
                {
                    $("#message").html(
                    "方向:" + current.dir +
                    "<BR>" + current.newWidth +
                     "<BR>height:" + current.newHeight);
                },
                onStopResize: function (current, e)
                {
                    $("#message").html("stop");
                }
            });
最后附上Demo下载: 下载地址
一,简介
ligerGrid的功能列表:
1,支持本地数据和服务器数据(配置data或者url)
2,支持排序和分页(包括Javascript排序和分页)
3,支持列的“显示/隐藏”
4,支持明细行(表格内嵌)
5,支持汇总行
6,支持单元格模板
7,支持编辑表格(ligerGrid的一个特色,需要其他表单插件的支持)
8,支持树表格(待加入)
8,支持分组(待加入)
二,第一个例子
引入库文件
如果不需要用到编辑功能,ligerGrid是一个单独的插件,也就是说只需要引入plugins/ligerGrid.js和样式css文件就可以使用(当然必须先引入jQuery)
<script src="lib/jquery/jquery-1.3.2.min.js" type="text/javascript"></script>
<script src="lib/ligerUI/js/plugins/ligerGrid.js" type="text/javascript"></script>
加入HTML
准备数据源
jsonObj.Rows = [
{ id: 1, name: "林三", sex: "男", birthday: "1989/01/12",score:63.3 },
{ id: 2, name: "陈丽", sex: "女", birthday: "1989/01/12", score: 72.2 },
{ id: 3, name: "啊群", sex: "男", birthday: "1981/12/12", score: 43.4 },
{ id: 4, name: "表帮", sex: "男", birthday: "1983/01/12", score: 73.2 },
{ id: 5, name: "陈丽", sex: "女", birthday: "1989/01/12", score: 74.5 },
{ id: 6, name: "成钱", sex: "男", birthday: "1989/11/13", score: 73.3 },
{ id: 7, name: "都讯", sex: "女", birthday: "1989/04/2", score: 83.2 },
{ id: 8, name: "顾玩", sex: "男", birthday: "1999/05/5", score: 93.2 },
{ id: 9, name: "林会", sex: "男", birthday: "1969/02/2", score: 73.4 },
{ id: 10, name: "王开", sex: "男", birthday: "1989/01/2", score: 33.3 },
{ id: 11, name: "刘盈", sex: "女", birthday: "1989/04/2", score: 53.3 },
{ id: 12, name: "鄂韵", sex: "男", birthday: "1999/05/5", score: 43.5 },
{ id: 13, name: "林豪", sex: "男", birthday: "1969/02/21", score: 83.6 },
{ id: 14, name: "王开", sex: "男", birthday: "1989/01/2", score: 93.7 },
{ id: 15, name: "鄂酷", sex: "男", birthday: "1999/05/5", score: 61.1 },
{ id: 16, name: "林豪", sex: "男", birthday: "1969/02/21", score: 73.3 },
{ id: 17, name: "王开", sex: "男", birthday: "1989/01/2", score: 41.6 }
];
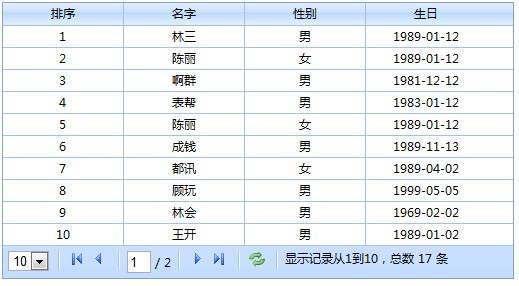
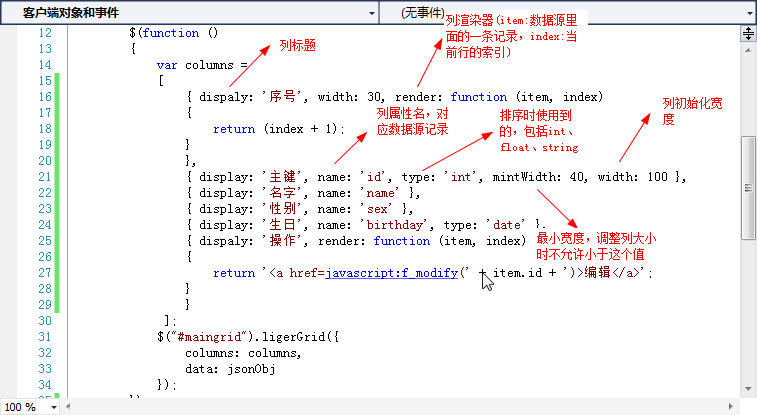
调用ligerGrid
[
{ display: '主键', name: 'id', type: 'int', mintWidth: 40, 100 },
{ display: '名字', name: 'name' },
{ display: '性别', name: 'sex' },
{ display: '生日', name: 'birthday', type: 'date' }
];
$("#maingrid").ligerGrid({
columns: columns,
data: jsonObj
});
这样效果就出来了:
三,几个重要的参数
1,标题:配置title和showTitle:true即可
columns: columns,
data: jsonObj,title:'我的标题',showTitle:true
});
2,宽度:ligerGrid会根据列自动计算出表格的宽度,当然也可以指定一个数值或者百分比来设置宽度
columns: columns,
data: jsonObj, '100%'
});
3,分页:默认是使用分页的,如果不想使用分页,可以配置 userPager :false
columns: columns,
data: jsonObj, usePager:false
});
4,滚动条:内容有太多的行时会出现滚动体,如果不想显示,可以通过配置isScroll设置是否出现滚动体
columns: columns,
data: jsonObj, isScroll:false
});
5,Column的配置
Dem下载:LigerUI.Demos.Grid
更多的文档和API后面会渐渐补充,浏览更多的应用请访问Demo.LigerUI.com
一,简介
jQuery LigerUI 是基于jQuery的一系列UI控件组合,包括表单、表格、提示框、窗口、布局等等。可以快速地创建风格统一大方的界面。因为是前端控件,跟服务器无关,可以适合.net,jsp,php等等web服务器环境。目前全部插件的打包压缩JS只有90K,很轻巧。
ligerui使用插件式的开发模式,以“简单”为原则的设计,每个插件尽量独立(如Drag和Resizable),并可依赖拓展,“编辑表格”、“可调整大小窗口”都说明了这一点。
二,界面
表单 - 日期

表单 - 调整器


表单 - 综合应用

表格 - 普通表格

表格 - 汇总表格

表格 - 明细表格


表格 - 模板

表格 - 编辑列表

布局

提示框


Drag And Resizable

二,下载与预览地址
Demo地址:http://demo.ligerui.com
下载地址: http://ligerui.googlecode.com/ (部分页面需要在.NET2.0的web环境才有效)