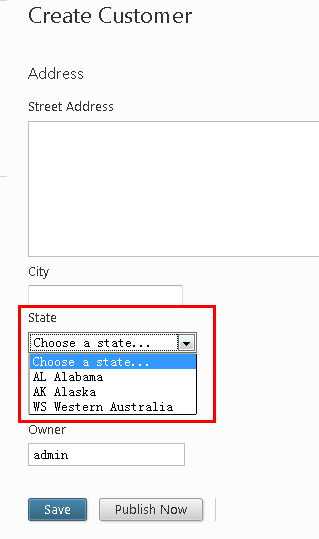
建立个人通讯内容时,从一个城市列表中下拉选择所在城市是非常普通的一个应用,这就是1-n的关系,本篇介绍Orchard如何支持1对多的关系。这里我们建立一个Address part,它将用在一个Customer content type中。The address part有address、zip code、city name、state。这个state和city将是一个1-n关系。
本篇将不再介绍如何建立Model,不清楚地可以查看之前写的Orchard:把之前写的Map Content Part专为一个Widget来使用
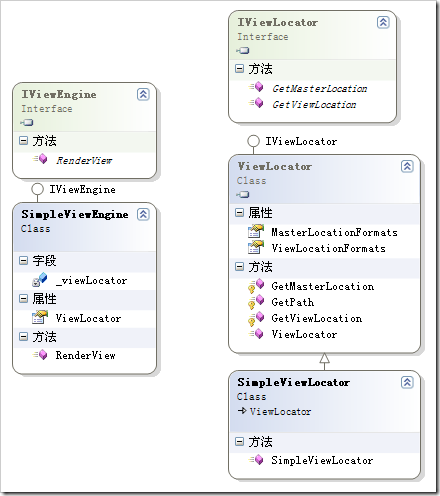
给address part生成模型
以下为Address model的代码
 using Orchard.ContentManagement;
using Orchard.ContentManagement.Records;
namespace RelationSample.Models
{
public class StateRecord
{
public virtual int Id { get; set; }
public virtual string Code { get; set; }
public virtual string Name { get; set; }
}
public class AddressPartRecord : ContentPartRecord
{
public virtual string Address { get; set; }
public virtual string City { get; set; }
public virtual StateRecord StateRecord { get; set; }
public virtual string Zip { get; set; }
}
public class AddressPart : ContentPart<AddressPartRecord>
{
public string Address
{
get { return Record.Address; }
set { Record.Address = value; }
}
public string City
{
get { return Record.City; }
set { Record.City = value; }
}
public StateRecord State
{
get { return Record.StateRecord; }
set { Record.StateRecord = value; }
}
public string Zip
{
get { return Record.Zip; }
set { Record.Zip = value; }
}
}
}
生成数据库表和part
using System;using System.Collections.Generic;
using System.Data;
using Orchard.ContentManagement.Drivers;
using Orchard.ContentManagement.MetaData;
using Orchard.ContentManagement.MetaData.Builders;
using Orchard.Core.Contents.Extensions;
using Orchard.Data.Migration;
using Orchard.Data;
using RelationSample.Models;
namespace RelationSample
{
public class Migrations : DataMigrationImpl
{
public int Create()
{
SchemaBuilder.CreateTable("AddressPartRecord",
table => table
.ContentPartRecord()
.Column<string>("Address")
.Column<string>("City")
.Column<int>("StateRecord_Id")
.Column<string>("Zip")
);
SchemaBuilder.CreateTable("StateRecord",
table => table
.Column<int>("Id", column => column.PrimaryKey().Identity())
.Column<string>("Code", column => column.WithLength(2))
.Column<string>("Name")
);
ContentDefinitionManager.AlterPartDefinition("AddressPart",
builder => builder.Attachable());
return 1;
}
private readonly IRepository<StateRecord> _stateRepository;
public Migrations(IRepository<StateRecord> stateRepository)
{
_stateRepository = stateRepository;
}
private readonly IEnumerable<StateRecord> _states =
new List<StateRecord> {
new StateRecord {Code = "AL", Name = "Alabama"},
new StateRecord {Code = "AK", Name = "Alaska"},
new StateRecord {Code = "WS", Name = "Western Australia"},
new StateRecord {Code = "...", Name = "Other"},
};
public int UpdateFrom1()
{
if (_stateRepository == null)
throw new InvalidOperationException("Couldn't find state repository.");
foreach (var state in _states)
{
_stateRepository.Create(state);
}
return 2;
}
}
}
添加handler
这里没什么特殊的,和以前介绍的构建module一样:
using Orchard.Data;using Orchard.ContentManagement.Handlers;
using RelationSample.Models;
namespace RelationSample.Handlers
{
public class AddressPartHandler : ContentHandler
{
public AddressPartHandler(IRepository<AddressPartRecord> repository)
{
Filters.Add(StorageFilter.For(repository));
}
}
}
The address service class
Address服务类依赖于state repository,这样就可以获得states列表。
using System.Collections.Generic;using System.Linq;
using Orchard;
using Orchard.ContentManagement;
using Orchard.Data;
using RelationSample.Models;
using RelationSample.ViewModels;
namespace RelationSample.Services
{
public interface IAddressService : IDependency
{
void UpdateAddressForContentItem(
ContentItem item, EditAddressViewModel model);
IEnumerable<StateRecord> GetStates();
}
public class AddressService : IAddressService
{
private readonly IRepository<StateRecord> _stateRepository;
public AddressService(IRepository<StateRecord> stateRepository)
{
_stateRepository = stateRepository;
}
public void UpdateAddressForContentItem(
ContentItem item,
EditAddressViewModel model)
{
var addressPart = item.As<AddressPart>();
addressPart.Address = model.Address;
addressPart.City = model.City;
addressPart.Zip = model.Zip;
addressPart.State = _stateRepository.Get(
s => s.Code == model.StateCode);
}
public IEnumerable<StateRecord> GetStates()
{
return _stateRepository.Table.ToList();
}
}
}
建立一个ViewModel
当在前端显示时,我们把part的所有属性都显示出来,包括state的code和name。我们现在需要建立一个ViewModel
using System.Collections.Generic;
using RelationSample.Models;
namespace RelationSample.ViewModels
{
public class EditAddressViewModel
{
public string Address { get; set; }
public string City { get; set; }
public string StateCode { get; set; }
public string StateName { get; set; }
public string Zip { get; set; }
public IEnumerable<StateRecord> States { get; set; }
}
}
添加driver
添加AddressPartDriver:
using JetBrains.Annotations;
using Orchard.ContentManagement;
using Orchard.ContentManagement.Drivers;
using RelationSample.Models;
using RelationSample.Services;
using RelationSample.ViewModels;
namespace RelationSample.Drivers
{
[UsedImplicitly]
public class AddressPartDriver : ContentPartDriver<AddressPart>
{
private readonly IAddressService _addressService;
private const string TemplateName = "Parts/Address";
public AddressPartDriver(IAddressService addressService)
{
_addressService = addressService;
}
protected override string Prefix
{
get { return "Address"; }
}
protected override DriverResult Display(
AddressPart part,
string displayType,
dynamic shapeHelper)
{
return ContentShape("Parts_Address",
() => shapeHelper.Parts_Address(
ContentPart: part,
Address: part.Address,
City: part.City,
Zip: part.Zip,
StateCode: part.State.Code,
StateName: part.State.Name));
}
protected override DriverResult Editor(
AddressPart part,
dynamic shapeHelper)
{
return ContentShape("Parts_Address_Edit",
() => shapeHelper.EditorTemplate(
TemplateName: TemplateName,
Model: BuildEditorViewModel(part),
Prefix: Prefix));
}
protected override DriverResult Editor(
AddressPart part,
IUpdateModel updater,
dynamic shapeHelper)
{
var model = new EditAddressViewModel();
updater.TryUpdateModel(model, Prefix, null, null);
if (part.ContentItem.Id != 0)
{
_addressService.UpdateAddressForContentItem(
part.ContentItem, model);
}
return Editor(part, shapeHelper);
}
private EditAddressViewModel BuildEditorViewModel(AddressPart part)
{
var avm = new EditAddressViewModel
{
Address = part.Address,
City = part.City,
Zip = part.Zip,
States = _addressService.GetStates()
};
if (part.State != null)
{
avm.StateCode = part.State.Code;
avm.StateName = part.State.Name;
}
return avm;
}
}
}
建立视图
- 前端
新建文件Views/Parts/Address.cshtml:
<p class="adr">
<div class="street-address">@Model.Address</div>
<span class="locality">@Model.City</span>,
<span class="region">@Model.StateCode</span>
<span class="postal-code">@Model.Zip</span>
</p>
<div class="street-address">@Model.Address</div>
<span class="locality">@Model.City</span>,
<span class="region">@Model.StateCode</span>
<span class="postal-code">@Model.Zip</span>
</p>
- 编辑视图
新建文件Views/ EditorTemplates/Parts/Address.cshtml:
@model RelationSample.ViewModels.EditAddressViewModel<fieldset>
<legend>Address</legend>
<div class="editor-label">
@Html.LabelFor(model => model.Address, T("Street Address"))
</div>
<div class="editor-field">
@Html.TextAreaFor(model => model.Address)
@Html.ValidationMessageFor(model => model.Address)
</div>
<div class="editor-label">
@Html.LabelFor(model => model.City, T("City"))
</div>
<div class="editor-field">
@Html.TextBoxFor(model => model.City)
@Html.ValidationMessageFor(model => model.City)
</div>
<div class="editor-label">
@Html.LabelFor(model => model.StateCode, T("State"))
</div>
<div class="editor-field">
@Html.DropDownListFor(model => model.StateCode,
Model.States.Select(s => new SelectListItem {
Selected = s.Code == Model.StateCode,
Text = s.Code + " " + s.Name,
Value = s.Code
}),
"Choose a state...")
@Html.ValidationMessageFor(model => model.StateCode)
</div>
<div class="editor-label">
@Html.LabelFor(model => model.Zip, T("Zip"))
</div>
<div class="editor-field">
@Html.TextBoxFor(model => model.Zip)
@Html.ValidationMessageFor(model => model.Zip)
</div>
</fieldset>
The placement file
项目根目录下新建part默认位置文件:
<Placement><Place Parts_Address_Edit="Content:10"/>
<Place Parts_Address="Content:10"/>
</Placement>
使用address part
打开RelationSample功能之后,我们新建一个"Customer"内容类型:
|
|

新建一个"Customer":
|
|
|
前端显示为: |

推荐:你可能需要的在线电子书
我的新浪围脖: http://t.sina.com.cn/openexpressapp
欢迎转载,转载请注明:转载自周金根 [ http://zhoujg.cnblogs.com/ ]